Showing posts with label Terrain Building. Show all posts

4 Ground Miniatures Pre-Painted Ruins

I have had a number of revelations recently-

  1. I am no longer out of things to write about
  2. I love the hell out of Flames of War
  3. I want a table full of European buildings to play on
  4. Battlefront/GF9 buildings are nice, but expensive and in super limited supply
  5. JR miniatures is not currently producing anything on account of not existing anymore (plus the scale on their buildings always seemed a bit off to me)
  6. Miniature Building Authority makes good shit, but it's expensive and I'm not against assembling/painting my own buildings
  7. I cannot scratch build buildings 

So, with that in mind I did an exhaustive several day search of the Internet looking for buildings that a) didn't look like retarded rhesus monkeys molded them, b) were affordable, and c) were readily available.

Enter the UK's 4 Ground.  I snagged a few buildings from a certain web store that I like and decided to try my luck.  I was so happy with the results, that I've decided to spread the word and do an unsolicited product review or two for the HoP.

Granted 4 kits is perhaps a rather large "test run" but meh
4 Ground produces buildings, carts, bases, and other terrain pieces using laser-cut MDF.  Currently they have a 15mm "Europe at War" line featuring western and eastern front buildings, walls, and fences.  For Players of other games, they also produce several different 28mm series featuring terrain for classical, dark ages, high medieval, European civil war, ACW, etc etc.

Kits are mostly available as pre-painted sets, but an increasing number are available as "blanks" that aren't painted.  Additionally, roof tiles, interior detail kits, and wheels and more are available to help pimp out your scenery.  They also offer a full line of branded paint, glue, tools, and more for hobbyists.  

I've been wanting to work with laser cut buildings for a while ever since seeing some of Lauby's new Infinity terrain board.  This seemed like the perfect opportunity to do so.  Being a hobbyist first and a gamer second, I decided to purchase 3 unpainted kits and 1 pre-painted set of ruins.  I enjoy painting terrain, so made the assumption that the more work I got to do the more I'd enjoy it.

Setting out to prove myself wrong, I selected the pre-painted ruins kit for my first assembly.

you had me at scent of bacon


The first thing I noticed when inspecting the package was the smell.  It's fucking glorious.  Imagine a fresh campfire, bacon, that wood burning kit your uncle bought you that one Christmas and you never used, and cedar all wrapped into one hit to your pleasure center and you're almost there.

After that I whipped out the instructions which were concise, but pretty clear.  All parts are lettered/numbered and the directions tell you what to stick to what along with a photo guide and a few helpful hints.  As a bonus, this kit featured a selection of street signs and posters to be added to the building.  They were basically just inkjet printings, but certainly get the job done.  This is admittedly something I was already planning on adding myself anyway, but this did save me the time of tracking down posters and fucking about with sizing them correctly.

posters and such
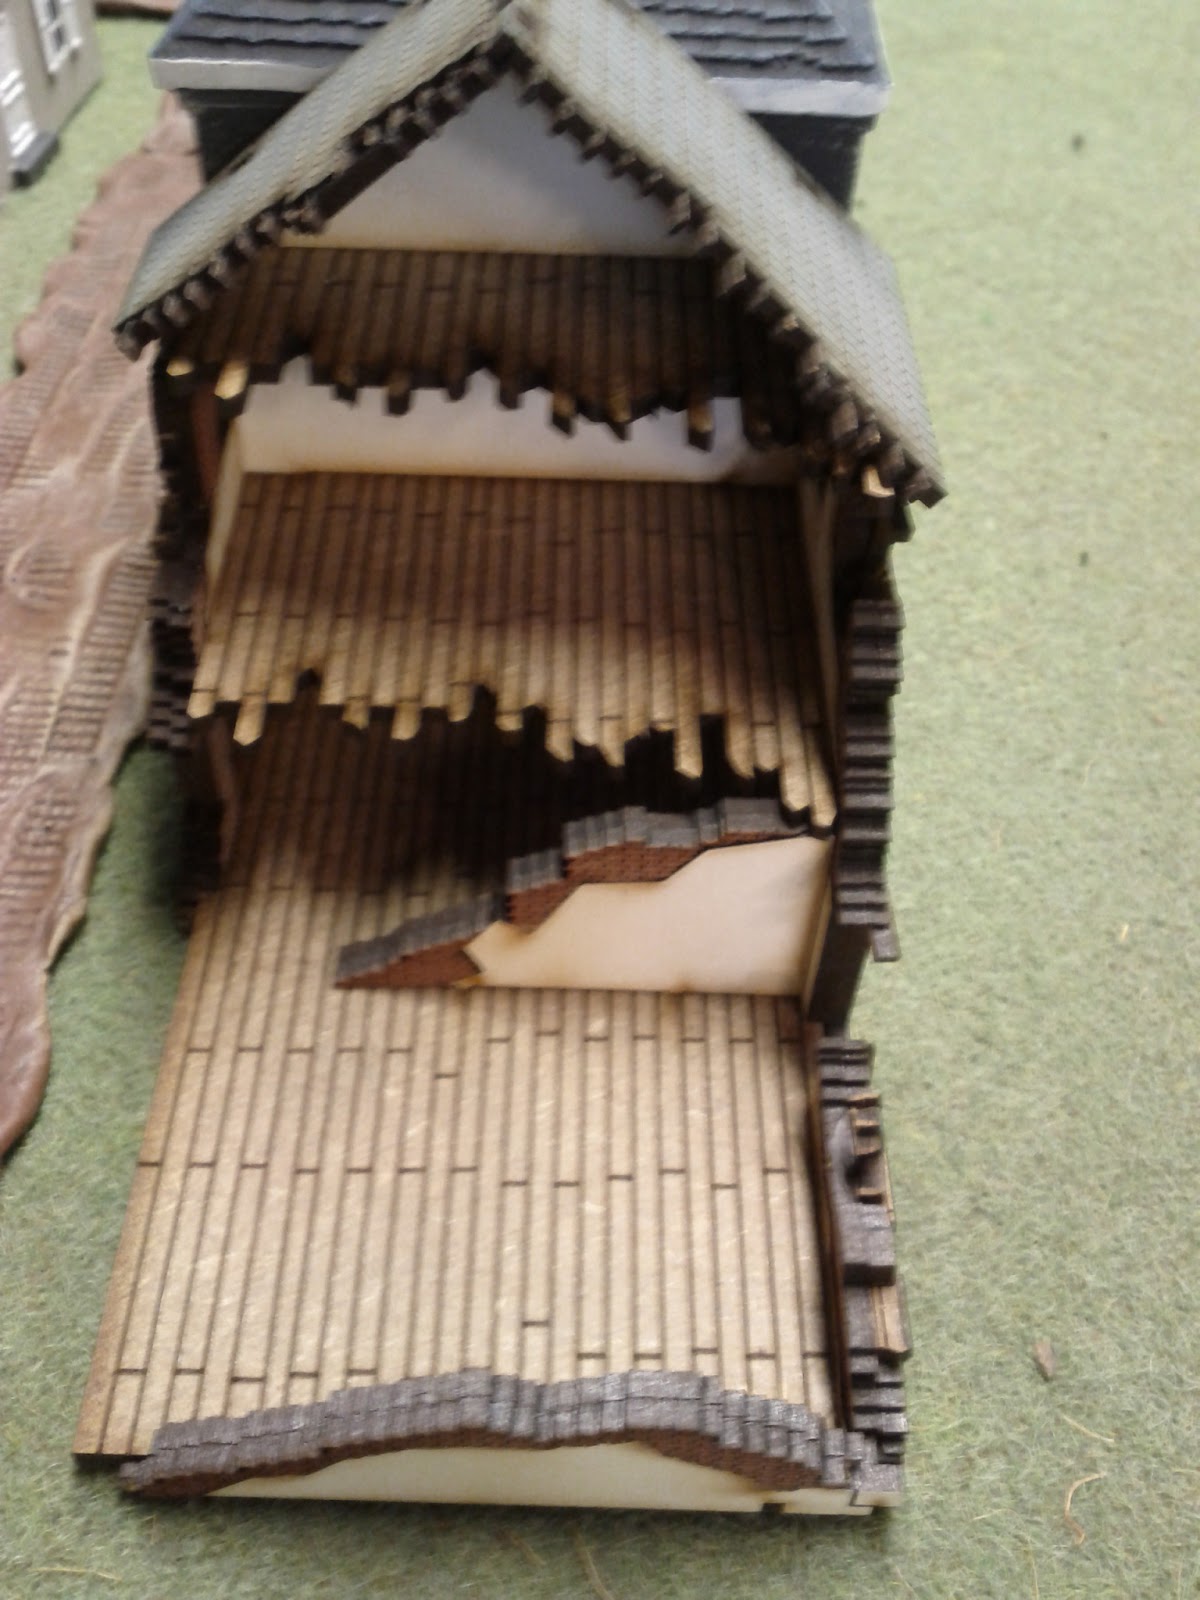
With that I dove into construction.  I won't give a step by step of this since that sounds boring.  I'll show a couple of in progress shots and briefly describe the assembly.

For tools I didn't need much.  The pieces pop out of the frame with ease.  Sometimes far too little ease as they can become separated during shipping, but it's not a big deal.  I had to clean up maybe a handful of pieces with a hobby knife.  Everything else came out clean.


Each frame is comprised of parts that are a single color.  Due to the laser etching and cutting process, there wasn't any need to shade or highlight these, as the cutting pretty much did the trick.  Since the pieces appear to have been laser cut after the painting process, there's even a nice scorching effect that adds weathering to the ruins.

Walls went up with ease with a little bit of PVA glue.  They were cut in such a way that they generally fit snuggly into place without have to be forced, making it easy to assemble and not need rubber bands or clamps to hold drying pieces in place.  Each wall for the painted kit is two pieces- interior and exterior.  This allows for indoor walls to be a different color than external walls while also adding some heft and thickness to the building.

interior day


exterior
With the major components together, it was time for the fiddly bits- brickwork and window panes.  Due to being a brick color, rather than the color of plastered wall, the exposed bricks of the ruin were separate pieces.  It was a fair amount of work to get these parts put together, but it was well worth the effort.  All that was left was to grab some tweezers and put the smallest window panes and sills into place I've ever seen.  It helped add a great deal of detail to the model without being overly difficult to assemble.  Just don't forget the tweezers.

She's a Brick House.  Mighty Mighty
30 minutes later (including photos) and I had a building ready for the table.  At a cost of only about 20% more than the unpainted buildings, I was quite pleased with the color choices and ease of assembly for this.  I think I'd still rather paint the buildings myself, but for anyone looking to quickly add terrain to their tabletop, these things are ace.

Here are some pics of the finished product and my Fallschirmjaeger company in action.

As you can see the scale is quite close to the new Batlefront kits, so mixing them wasn't at all awkward.


Ok, let's put some dudes in that building.


How about a tank?  You got it.


And lastly, let's check out one of those posters in action as the 6.  Fallschirmjaeger move out.


That's it for today kids.  Go check out 4 Ground today, I think you'll like it.  I'll be back in the future to show you an unpainted kit in action.  We'll get to see how the assembly differs and figure out how well these things take paint.

Gaming on a Budget: DIY Movement Trays

Since today is the first day off I've had to myself in a while (though it's looking increasingly likely that I will have to go in to work to fire somebody later today...), I decided to shirk my responsibilities and bring you an excellent community post.   

A couple of years ago Hoagy- my good friend, fellow band mate (if you click the link and then like us, I'll be happy- if you download our ep from iTunes or Amazon, I may even take off my pants for you), and purveyor of the excellent blog "When Canons Fade" (you should also click this link and like this page, but I'm not as likely to remove clothes for you as with the band thing)- wrote up an excellent piece that fits into the budget paradigm on building your own movement trays.  Apologies in advance for the non-existence of all paints mentioned in the tutorial.  I'm sure you all can figure it out, though.  Hope you enjoy and see you next week.  


Article after the random picture from my collection and the obligatory jump.  JUMP I SAY!


Hoagy, artist's interpretation


With my first game of WFB looming rapidly on the horizon I picked up a pack of the plastic movement trays that GW produces. They’re ok, for models with bigger bases, but I wanted to create my own.  I’ll be playing Tomb Kings, and as such, will be using minis with smaller bases. Now, anyone who has seen the TK minis will see how spindly they are. This can prove to be a bit of a pain in the arse when it comes to moving them around, and I didn’t want to be wasting time arranging them properly everytime they marched around the battlefield.
Dutifully I went to JoAnne Fabric and picked up some mounting card. I already had foam card at home so I already have everything I need. Initially I was thinking of using just the foam card but realized that the skellies would practically be standing head and shoulders above the other minis. Hence the thinner and stronger mounting card.
With the mounting card, draw around your base. Do this for your frontage and your depth, depending on what size unit you’re fielding. As I will be making this for a unit of 10 skellie archers, frontage will be 5 with a depth of 2:


Once you have your base measured up, cut it carefully from the sheet of card. Keep the lines as straight as possible. This one became my ‘master’ so I can use it for making more bases whenever I needed. From here we draw around this again onto the mounting board. Then we draw a bigger box around it. This extra spacing will be where our lip runs around the edge of the base:


Cut this from your  sheet of card. You now have your base which encompasses the 10 bases, plus the lip around the edge. Everyone following this ok?
Now, to the foam board. Trace around the larger base you just cut. then, lay your original template (the 10 base one from step one) on top. Make sure the spacing around the edge is roughly equal then trace around it. Then you’ll need to cut (very carefully) this centre piece out. You should end up with something that looks like a licence plate holder:


Get some all purpose clear glue and glue your foam card license plate holder to the mounting card base. You should be looking at something similar to the picture above. Don’t worry if it doesn’t look perfect, we’ll be messing with that in a moment. I stuck my unit in it, just to give it a test fit:


Now, grab yer scalpel, or other sharp knife. We need to trim the edges down to give a more natural appearance, thus:


You’ll see now why it wasn’t a big deal if it didn’t all look totally straight, as you’ve changed it now anyway. You can be as zealous or reserved as you like here, it’s all down to personal preference.
We need to texture it now and you can do that one of two ways. First is to mix sand and PVA wood glue and paint this all over, or, if you want a quicker solution like me, you may have some ‘pumice’ which is available from most hobby stores. So, brab a brush and liberally slap it all over the outer ridge:


And you should end up with something like this:


The final stage is simple. You paint them! Paint them whatever color you need. As mine need to look all desert like, I start with a basecoat of Snakebite Leather:


Then a drybrush of Bubonic Brown and then finally Bleached Bone yields these results:


Thats it! you are done! I made 3 straight off, so I could put 2 units of skellie archers and a unit of Tomb Guard in them. They’re looking pretty sweet, and help give the army a uniform look.


Hope you liked this tutorial. More coming soon!
Paul

Gaming Without a Budget - Lauby's Malifaux Table

Hello and welcome to another installment on how to lord your disposable income over poor neck-beards.  Today we're going to be spending way more money than we need to with just a touch of a  "This Old House" vibe.

Let's get to it.

Special Lady Friend and I recently started up Malifaux and we're having a grand old time at it.  But after a few test games it became apparent that we were in dire need of a gaming surface. Now, most people's first thoughts on this topic would be on how this could be done cheaply.  Screw that noise! Lets spend some goddamn money and do this up proper!"

With all that in mind, I set out to plan and build a 3'x3' gaming surface that I could potentially shelter under in the event of an earthquake.

Shelter more like the girl in front, not those idiots in back.
Step zero (as I am now, as snootily as possible, calling it) was research.  I've not made a lot of gaming surfaces as I've never needed them in my own home. Or at least not ones with grass on them. So there were some questions I needed answered so that spending a lot of money didn't become wasting a lot of money (remember, spending money with nothing to show for it = bad). Thankfully, I had some articles on the Good Robot Us's site to work from.

STATION!
A Mr. D. Tron has made a much more frugal effort to make a gaming table and I will be using this as a guide for technique if not cost. And, seriously, go read those two posts because I am going to be making a ton of references to them.

Important note: Be sure to click on any images for enhugening purposes.

As with dethtron's Flames of War table, it all starts with the base material.  In this case, a 3/4" sheet of MDF cut into the proper sizes. The fact that I got two 3x3 squares AND kept the left overs is about the only nod to saving money you're gonna see today because it just couldn't be helped.   Well, that and the fact that you can totally have the Home depot guys cut things to size for you - which you should totally have happen.  So about $30 bucks for that all said and done for a contractor sized sheet.

Also a cat.  The internet loves cats.
So why MDF (medium density fiberboard)?  To paraphrase the manager in This is Spinal Tap: "having a good solid piece of wood is quite often...useful".  If I'm honest, I just plain don't like insulation foam.  It's for poor people - along with macaroni & cheese, American cars and 20xx vintages of wine.


Now you may be questioning the weight of a 3/4 inch thick peice of wood - and your right, it does weigh about 1.2 fuck-tons (or 1 metric fuck-tonne for your Euros and your everyman metric system.  God, I hate you).  But for me, the weight is a design feature rather than a flaw - it's part one of my ingenious (and expensive) system to keep my gaming board from sliding around.

Now it's on to actual construction.  Step one of that is the basic prep work  - namely sanding the edges smooth and then wiping ALL of the saw dust off.  The sanding being especially important since I was/am going to add some veneer edging to cover up the rough cut sides.

Another potential expense is the iron, if all you wear is wrinkled cloths
One of the things I really wanted to do was make sure the edges of the surface looked 'finished'.  In my mind, if your going to spend time and money making a good looking gaming surface, you don't want anything to detract from it.  It's a lot like painting a great miniature and then making the conscious decision to not base it. Anywho, the edging is pretty easy to apply so long as you have an iron and some patience. I picked up some natural birch flavored stuff for about 8 bucks.

Important note:  Probably a good idea to do the edging before painting and flocking (like me) because of the heat issues.

See how rad that looks? And that's just one side.
I edged to all four sides and then moved on to painting - being very careful to cover the edges in masking tape to keep that natural birch goodness intact. There's a reason you spent money in it in the first place and it wasn't to hide the fact that you spent money.

Mr. Tron's sand + paint trick is one of the best bits of tech I've ever had the opportunity to implement.   I did a first coat of paint with no sand in order to make sure my coverage was good. Then I mixed some sand into a wad of paint and textured it up.  

Important note:  You'll need to filter the bigger chunks of rock out of the sand in order to get a uniform surface when you're using this trick.  Those bigger lumps can really cause problems with terrain laying flat or miniatures staying upright.

Note on the Important note:  If you pop a storm screen off of a window on your apartment to strain sand with, you should under no circumstances tell your significant other whom you live with that you did this.

I started drybrushing the highlights before I remembered to take a picture
I think it's relevant to point out another area in which I made the conscious decision to not save money again and just get exactly what I wanted.  I had been slumming it a bit and spent some time searching in vain for a good shade of brown in the mis-mixed paint section of the local DIY stores.  I gave up after the $2 special turned out to be less brown and more "diarrhea orange".  Which may actually have been mis-mixed rather than evidence of the piss-poor judgment of some mouth breathing suburbanite.  So I just said 'screw it' and had the worlds biggest pot of P3 Gun Corps Brown made up.  Color matching FTW.  All said and done, it was about $15 for the good color and my experience with random chance.  Highlighting was a simple affair of drybrushing some craft paints on.

Lookin' snazzy already
Normally, the next step would be to add the static grass.  But there is one, crucial, flaw that a slab of MDF has that insulation foam does not - a heavy slab of wood is not going to be the gentlest thing to happen to the top of an Ethan Allen table.  So there's a problem that needs a solution.  Which also brings me to part two of my plan to keep this thing from sliding around:  Rug Gripping Tape.

I just realized that I photographed the french side of the box.
The tape adds a nice little pad to protect the table this thing will sit on AND gives it plenty of grip.  I, literally, had to hip check this thing to get it to move.  So $8 bucks well spent. Oh, and I did the tape before the flocking because I wasn't too interested in mussing up the grass if I did it the other way around.

Important note: The rug tape I was using is only sticky on ONE SIDE. So be careful when you're shopping for rug tape since there are similar products that are intended to actually tape the carpet to your floor.

NOW it's flocking time. First, I re-masked the edges.  Second, the glue.  Courtesy of Elmer's.  I ended up using about a bottle and a half of the 8oz sizes. 


The keys here are having a large paintbrush, speed and good coverage.  The masking tape is excellent since it allows you to get a bit sloppy with no repercussions.  Or at least I didn't have any.  In any case another $10 bucks for glue and some low tackiness masking tape.


I then used pretty much the same flocking recipe that good ol' dethtron used - but with an added pinch or two of some yellow-brown grass for extra flavor.  So about $17 .  As a bonus, between the left over flock and the paint, you'll have all the materials you'll need to perfectly match any terrain you may build to the table.

Important note: If it's maybe a hot day while you're doing all this, it may be a good idea to get a sweatband or a head rag or something.  It turns out that sweat will actually stain static grass.  But on the plus side, I can say that this table has a little bit of my actual being in it.

After the glue was dry it was time for a couple coats of a clear matte spray to seal in the goodness and for added durability.  I got some artist quality stuff from Krylon that I am assured will not yellow over time.  We're building this thing to last, so a bit of foresight is required.  So another $8. 

Some more waiting for things to dry happened and then it was time to remove the masking tape and carefully trim off the sticky-out parts from the flocking.


And there we are.  A pretty darn great gaming table if I do say so myself.  And I do.  Also a good conversation piece to break up the lulls between  mouthfuls of canapé.  All for the low, low cost of around $90.

HoP Idol: Display Boards 101

Now here is a tutorial that all of you tournament goers will love.  Inquisitor_Dunn is about to drop some science on you and show you how he made his most recent display board for the 40K tourney scene.

Display Boards 101


My first display board.

I don't consider myself the greatest modeler or the best painter out there. Heck, my armies are all pretty much average. So when it came time for me to build a display board, I was pretty intimidated.
I watched a few video how to's on it and they all had this basic core that I think any hobbyist can do. They all stayed simple, light, and cheap.
Most used a simple poster board for the base. Walmart has them for $10-13 and Staples or OfficeMax is a good spot for higher quality ones. Sand, big bottles of Elmer's glue, flock, and small terrain pieces are items you want to collect/buy also.
I started off by using masking tape or painter's tape and covering the outside frame. For gluing terrain pieces to the board, remember what materials you are gluing and use an appropriate glue. These walls were made of plaster so I used a Gorilla Glue made for wood and ceramics. For sand and flock, I simply spread Elmer's glue with a brush and then sprinkled them on.


Good stuff!

After letting it dry/cure completely, I primed my whole board black. I chose to make a road down the middle using Rust-Oleum's American Accents Stone. This stuff is great if you want to do cement looking areas on the fly. Fast, easy, you could just do a whole board like this and paint road lines on it.


My test board. Takes about 3 passes to cover good.
After getting my primers on, I painted the brown areas. I simply used 2 colors that I use for alot of my bases, Scorched and Dark Flesh. Use what ever colors you have on your army's bases.


Last steps I did was gluing flock and lichen on. I also painted some of the details like walls and barrels up. Nothing to fancy just some drybrushing and washes.


My second board finished.


Peal the masking tape off the frame and you have an easy and light display board for any GT or RTT. It took me about 3 days to make mine. One day was for drying glue and one for drying primer/paint.


My Crimson Fists at the 2011 Bugeater GT.

I hope you find some inspiration to build a board for your army. They really do make moving from table to table easier and help display your army better. Just remember to keep it simple, you want to display your army not your board.

Gaming on a Budget Paper or Plastic-Card? from Auberon

Greetings everyone.  Last week Auberon of the Digital Waaaaggghhh! e-mailed me a great list of ideas for "Gaming on a Budget articles."  Many of them were so good that I asked him if he'd want to write a guest spot on them (thus buying me some time to organize the HoP Idol contest).  So sit back, relax, and keep an eye out for the science that's about to be dropped.  And as a bonus, this is probably the first article in this series ever to feature zero senseless fucking profanity...oh wait....


Hey guys (and gals) –

Auberoun from Digital Waaagh here, if you’re anything like me, you absolutely love the Gaming on a Budget series that deth has been working so hard on. Last week, I wrote him and suggested some ideas. Imagine my surprise when he threatened to melt down my scratchbuilt Stompa politely asked me to do a guest article!


Plastic card - I could get into all the uses of plastic card, and how great of a tool it is in conversions, and scenery building, but I was told to write an article on saving money, not the joys of plastic card. So, if you like to convert, this is almost mandatory for Ork players. (Xenos love!) then you inevitably need some plastic card.


A quick definition for those noobs who need to learn what we are talking about. (We were all noobs at one time, so if you are an old, beardy git, just hang with me.) Plastic card (Styrene or P-card as it is sometimes referred to) is sheets of plastic that come in very useful when making your own models, or converting existing models. (That wasn’t bad was it?)


Now, there are some great suppliers out there that sell textured card, and varying tubes and “I” beams and such. I would say, that the retail price on those items is worth it for terrain building, and converting. But, what if you just need plain, un-textured card? Let’s face it, the plain card has a lot more uses. Besides, though not the same you can texture it yourself if you needed to...because this is about saving money.


There are numerous places to score plastic card for FREE! That’s right, I said FREE! Not just free…but FREE! Ok, now that I beat that point into your heads, time to move on. (Did I take my medicine today?)

Here are some sources of free plastic card…

Old gift cards and old key cards are a great supply for thick plastic card.

“But how or where do I get them?” You may ask.


Hotels - Go to the local hotels yourself, and ask for old keys that no longer work and (as weird as it may sound) explain why you want them. You could say that you are collecting them to harvest the plastic in order to make your Real Doll trans-dimensional stabilizer for your time-machine. On second thought, honesty usually goes a long way, and is your best route to scoring free plastic card.


Mall stores (or any store that uses prepaid gift cards). - Just ask a few shops in your local mall to give you some of their old gift cards that have 0.00 remaining balance, or if they can keep them for you, you can come by once a week to pick them up. ( be sure to remain open in negotiating pick up times if you get to this point with the manager, after all, you are getting free hobby material!) Or, if you are lucky enough to know someone in a retail setting, they can probably save all the old ones for you. This also goes for anyone working in a hotel that uses key cards.


I had heard one hobbyist who was lucky enough to get the off cuts and scraps of errors from a sign company in his area...on a regular basis! The best part aside from being regular source of free material was they were big pieces of varying thickness. (If memory serves, he said his biggest find that way was 1/16 inch thick 6'x8' sheet. If you know of a sign maker in your area, it would be worth checking into, to see if they will let you "loot their scrap”.


The last option, while not free, the alternative is still cheaper than buying plain card. Go to the hardware section of a standard retailer, or somewhere that sells “For Rent” or “Beware of Dog” or any other similar signs, and price them. I know there is a place by where I live where they average about $1.00 per sign. Used sparingly, you can probably get a quite a few projects from it.

If you need some thinner plastic card, use food boxes. Or cereal boxes to be more precise. While not plastic, they certainly have their uses. They are thin and flimsy, but may be just the ticket for making “wooden” shingles, or bending around a pipe or gun barrel, arm etc… to add some sort of extra armor or detail. There is loads of free scenery in pdf format. (As Lauby had mentioned previously) Cereal boxes can be used for those too! Cut out the pieces, and glue them to a cereal box panel that has been cut out. The best method for this is using white glue, then putting a heavy book on them so they don’t warp and coming back in a few hours after they are dry. This will add some stability to your pdf structures.

So, get out there, and score some FREE p-card!

I will be returning in week after next to talk about how to score some free or cheap hobby/terrain building supplies that are not commonly found around the house.

Your move…

Auberoun

Totally awesome Auberon, thanks for sharing.  If you've got a source for free plasticard or liked what you saw here hit us up in the comments.  If you're a moron and have missed all the other links, make sure to visit The Digital Waaaggghhh! to check out the excellence going on there.  And as always, by all means, if you've got a money sharing tip you need to share, hit us up at info@houseofpaincakes.com.  Who knows, you may be threatened with a guest article of your very own.